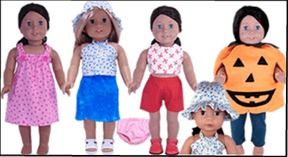

I received, for review, a 12-month subscription to Rosie’s Doll Clothes Patterns which consists of more than 130 online instructional sewing videos and 8 free PDF printable patterns for the American Girl Doll, or other 18” doll, which included:
- Sport shorts
- Crop top
- Sarong
- Halter Top
- Summer Nightie
- Hat
- Pumpkin
- Underpants

The How To Sew Doll Clothes lessons consist of six weeks worth of several video instructional courses within each. It covered sewing basics, troubleshooting tips as well as tips for sewing doll clothes, and offered patterns which I downloaded in PDF format and printed to use.
All we needed was a computer to view the instructional videos and a printer to print off the patterns, with paper. Also, of course, we needed a sewing machine, and basic supplies like scissors, pins, safety pins, ruler, thread, fabric, etc. After watching how easy it was for Rosie to use her rotary cutter, I also purchased my own rotary cutter and used a craft cutting board to make it easier to cut the fabric.
Rosie’s Doll Clothes Patterns site includes yearly memberships which gives you access to the videos and several free patterns. You can also buy additional patterns available on the site if you like.
12-Month Online Membership - $48.12
If you prefer, you can order the videos on a DVD set for $67.39
The videos ranged from basic tips, to how to set up a sewing room and safety issues, to troubleshooting tips for common sewing problems, to step-by-step instructions on how to sew the 8 patterns that we received free as part of the membership.
I told my girls, age 7 and 11, about the course and how excited I was that they could have this kind of instruction. Neither girl really has any background in sewing other than using a “toy” chain stitch sewing machine to basically just get the feel for sewing. I have a moderate amount of history with sewing, mostly from a Home-Ec class I took when I was about my oldest daughter’s age.

The lessons are recommended for Beginner or Intermediate seamstresses or for children ages 8 and up. Here’s a complete list of the videos included in this review:
Week 1
Introduction to How to Sew Doll Clothes
Welcome
Let’s Get Started
Setting Up Your Sewing Room
Organizing Your Work Space
Tools That Make Sewing Doll Clothes Easy
Sewing Kit for Beginners
Cool Tools
Ultimate Tools
Serger
Everything You Need to Know About Fabric
Fibres
Types
Nap
One Directional Print
Know Your Elastic
Sizes, Quality and Types
How To Use Your Sewing Tools
Sewing Machine Needles
Needle Threader Hand Sewing
Needle Threader Sewing Machine
Tape Measure
Chalk and Marking Pen
Safety Pin
Bodkin
Looper
Point Turner
Sewing Gauge
Rotary Blade
Cutting Mat
Iron and Ironing Board
Cool Tips When Using Your Sewing Tools
String
Sewing Machine Pin Cushion
Thread and Rubbish Collector
Looper
Fabric Scissors
Small Scissors and Clippers
Safety Pin Turning Bodice to Right Side
Ruler
Week 2
How To Print, Prepare and Cut Your Pattern and Fabric
How to Print Your Pattern
Paper Pattern Instruction Explanation
Cutting Out Paper Pattern Pieces
Gluing Paper Pattern Pieces
Placing Paper Pattern on Fabric Fold
Placing Paper Pattern on Fabric Grain Line
Pinning Paper Pattern on Fabric
Cutting Out Fabric – Fabric Scissors
Cutting Out Fabric – Rotary Blade
Cool Tips When Preparing Your Pattern and Fabric
Paper Underneath Pattern When Gluing
Troubleshooting When Prepping
Pattern Pieces
Troubleshooting When Cutting Out Pattern Pieces
Pin Placement
Fabric is Creased
Using Leftover Fabric
Cool Tips When Working with Fabric
Small Piece of Fabric Not Large Roll
Using Your Child’s Favorite Old Outfit
Small Print
Right and Wrong Side
Beginner Use Woven not Stretch or Shiny Fabric
Troubleshooting When Working with Fabric
Dark Colors Running
Cool Tips When Working with Thread
How to Check Quality
Match Color
Week 3
How To Stitch Straight and Zigzag
Straight Stitch Length
Straight Stitch Needle Position
Straight Stitch Thread Tension
Zigzag Stitch Overview
Zigzag Stitch Length
Zigzag Stitch Width
Zigzag Stitch Thread Tension
Cool Tips to Make Sewing a Straight Line Really Easy
Sewing a Straight Line
Troubleshooting That Will Save You Time
Pin Direction When Sewing
How To Sew a Hem
Sewing Machine Woven Fabric
Sewing Machine Curved Hem
Sewing Machine Square Hem
How To Create More Advanced Hems
Sewing Machine Knit Fabric
Sewing Machine Knit Fabric Lettuce Leaf Hem
Serger and Sewing Machine
3 Thread Overcast Then Sewing Machine Hem
Serger Rolled Hem Woven Fabric
Serger Rolled Hem Knit Fabric
Cool Tips to Make Sewing Doll Clothes Really Easy
Hem before Seam
Press Hem before Sewing
Press Bodice before Sewing Side Seams
Week 4
How To Stay Stitch
Stay Stitching
How To Sew a Seam
Sewing Machine Woven Fabric
Sewing Machine Knit Fabric
Sewing Machine Convex Curved Seam
Sewing Machine Concave Curved Seam
Sewing Machine Square and Corner Seam
Troubleshooting That Will Save You More Time
Seams Coming Undone
Clipping Curved Seams
How To Serge a Seam
Serge a Seam
How To Create a Casing
Sewing Machine Woven Fabric
With Frill Heading Woven Fabric
How To Create More Advanced Casings
Serger and Sewing Machine Woven Fabric
Sewing Machine Knit Fabric
How To Create Tubes and Straps
Sewing Machine
Serger
Week 5
How To Thread Elastic Through a Casing
Using a Looper
Using a Safety Pin
Using a Bodkin
How To Use Elastic to Save Time
Stitching Through Elastic
Stitching Over Elastic
Stitching Through and Hemming in One Step
Cool Tips When Working With Elastic
Mark Don’t Cut
Threading Through Casing (CTV)
Troubleshooting When Working With Elastic
Threading Through Casing (TSV)
Attaching to Fabric
How To Gather
Gathering
How To Attach Intricate Pieces Together
Puff Sleeve to Bodice
Frill on Top of Fabric
Frill in a Seam
Ribbing
Collar
Week 6
How To Attach Trimmings
Motif
Buttons Using a Sewing Machine
Buttons Hand Sewing
Bows Using a Sewing Machine
Bows Hand Sewing
Lace Using a Sewing Machine
Lace Using Serger and Sewing Machine
Ribbon
Felt Shapes
Sequins
Cool Tips When Working With Ribbon
Stop Ribbon Ends Fraying
How To Attach Fastenings
Velcro
Press Studs
Cool Tips to Make Your Doll Clothes Fit Lots of Dolls
Use Velcro for Flexible Sizing
Cool Tips When Working With Buttons
Cutting Button Holes
Using Buttons as Decoration
Congratulations You Did It!
Course Bonus Patterns
Week - 1
Free Sport Shorts
Free Sports Shorts – Steps to Complete Your Outfit
Week - 2
Free Crop Top
Free Crop Top – Steps to Complete Your Outfit
Week - 3
Free Sarong
Free Sarong – Steps to Complete Your Outfit
Week - 4
Free Halter Top
Free Halter Top – Steps to Complete Your Outfit
Week - 5
Free Summer Nightie
Free Summer Nightie – Steps to Complete Your Outfit
Week - 6
Free Hat
Free Hat - Steps to Complete Your Outfit
Free Pumpkin
Free Pumpkin - Steps to Complete Your Outfit
Free Underpants
Free Underpants - Steps to Complete Your Outfit
As you can see, it’s quite detailed. Each video was long enough to give detailed instruction, but short enough to hold a child’s interest. They seemed to range from around one minute to about 12 to 15 minutes each, depending on what was being covered.
I found the instruction to be really good. As a bonus, we all loved Rosie’s Australian accent. She was friendly, detailed and really broke everything down to individual easy-to-handle steps really well.
The time came to pick out fabric and actually make something. I took the girls shopping for fabric where they got an even more extended education on sewing, cutting fabric and picking out something that would work with each pattern as well as a print small enough that wouldn’t overwhelm the small doll, and finding fabric I could afford.


Here's some of how the final projects looked:


Nice outfits. We have to make the pjs next. I love that you took the girls in for the whole fabric shopping experience.
ReplyDelete